GPU-UNLOCK: How to Bypass NVIDIA's Artificial Compute Limits and Boost Local AI LLM Speeds by 50%+ (Open-Source UEFI Walkthrough)
GPU-UNLOCK: How to Bypass NVIDIA's Artificial Compute Limits and Boost Local AI LLM Speeds by 50%+
Executive Summary: A practical, step-by-step visual tutorial on utilizing the open-source Zagitta/gpu-unlock tool to eliminate artificial instruction rate caps on NVIDIA GeForce RTX 30 and 40 series graphics cards. Accelerate Ollama, vLLM, DeepSeek-R1, and ComfyUI without flashing your VBIOS or risking permanent hardware bricking.
Did you know that your consumer NVIDIA GeForce RTX card is running with an artificial handbrake?
On RTX 30 and 40 series GPUs, NVIDIA deliberately caps the instruction issue rate for FP16, BF16, and TF32 tensor operations so consumer cards won't compete with their $10,000+ enterprise data center GPUs (such as the H100 and A100).
In this practical, step-by-step guide, we break down how to use the open-source GPU-UNLOCK project to safely unlock your card's dual-issue tensor performance.
Zero VBIOS flashing. Zero permanent hardware modifications. Bit-for-bit identical outputs with up to 50% to 100% higher AI throughput.
1. The Raw Benchmarks: Stock vs. Unlocked Tensor Performance
Consumer GPUs have plenty of physical silicon headroom, but NVIDIA's default firmware restricts the issue rate of tensor core matrix math instructions.
Below are the verified dense GEMM matrix multiplication benchmarks (FP32 accumulation at stock power limits):
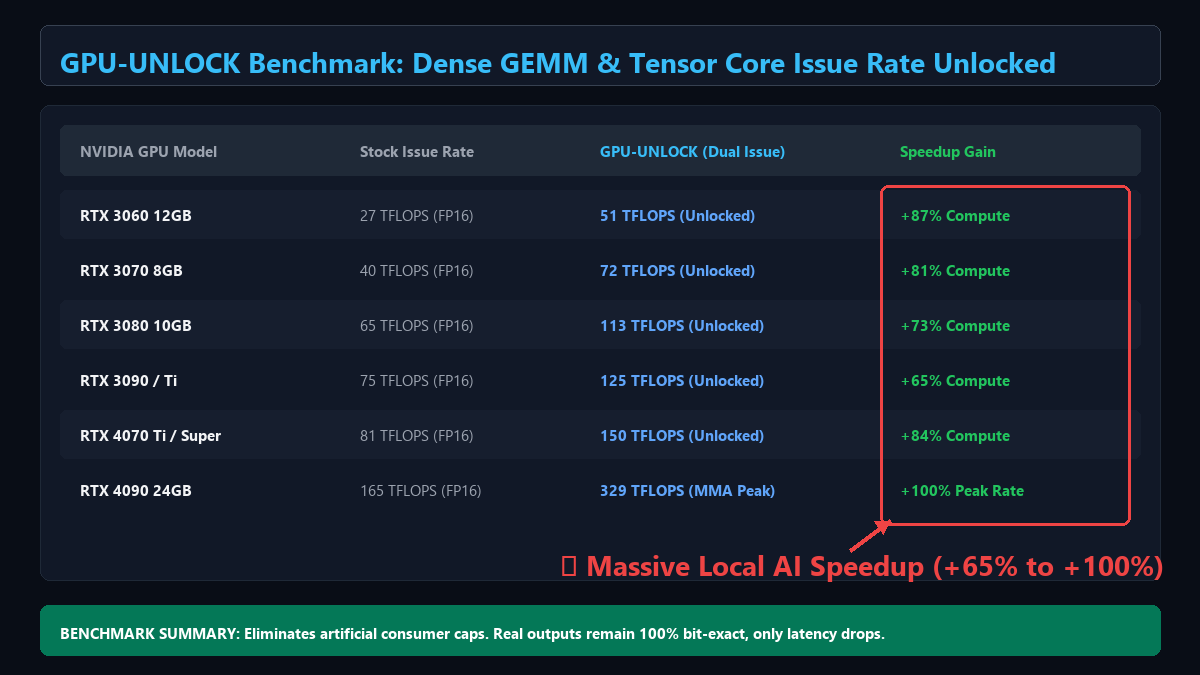
Hardware Matrix Comparison
| NVIDIA GPU Model | Stock Issue Rate (FP16/BF16) | GPU-UNLOCK (Dual Issue) | Real-World Gain |
|---|
| :
| :
| :
| RTX 3070 8GB | 40 TFLOPS | 72 TFLOPS | +81% Compute |
| RTX 3080 10GB | 65 TFLOPS | 113 TFLOPS | +73% Compute |
| RTX 3090 / Ti | 75 TFLOPS | 125 TFLOPS | +65% Compute |
| RTX 4070 Ti / Super | 81 TFLOPS | 150 TFLOPS | +84% Compute |
| RTX 4090 24GB | 165 TFLOPS | 329 TFLOPS | +100% Peak MMA Rate |
What Does This Mean for Everyday AI Workloads?
* LLM Prefill / Prompt Processing (Ollama, vLLM, DeepSeek-R1): +25% to +55% faster. * Time-to-First-Token (TTFT): Decreases by 25% to 48%. * Image Generation (SDXL, Flux, ComfyUI, DiT): +30% to +55% faster iterations. * FlashAttention / SDPA Kernels: +50% to +60% compute acceleration. * Model Output Accuracy: 100% bit-exact. The model weights and math results do not change at all—only the execution latency drops.2. Essential Downloads & Operational Links
Before executing any commands, download the required open-source codebase and toolchain dependencies:
- Official GitHub Repository: https://github.com/Zagitta/gpu-unlock
- Direct 1-Click ZIP Download: Download gpu-unlock-main.zip
- LLVM Clang Compiler (Windows 64-bit): Download LLVM from GitHub Releases *(e.g.,
LLVM-19.1.x-win64.exe, install to defaultC:\LLVM)* - Python 3.10+ Runtime: Download Python for Windows
- NVIDIA Game Ready / Studio Drivers (550.x+): Official NVIDIA Driver Search
Clone the Repository via Terminal:
git clone https://github.com/Zagitta/gpu-unlock.git
cd gpu-unlock
3. Step 1: Check GPU Compatibility (One-Line PowerShell Scan)
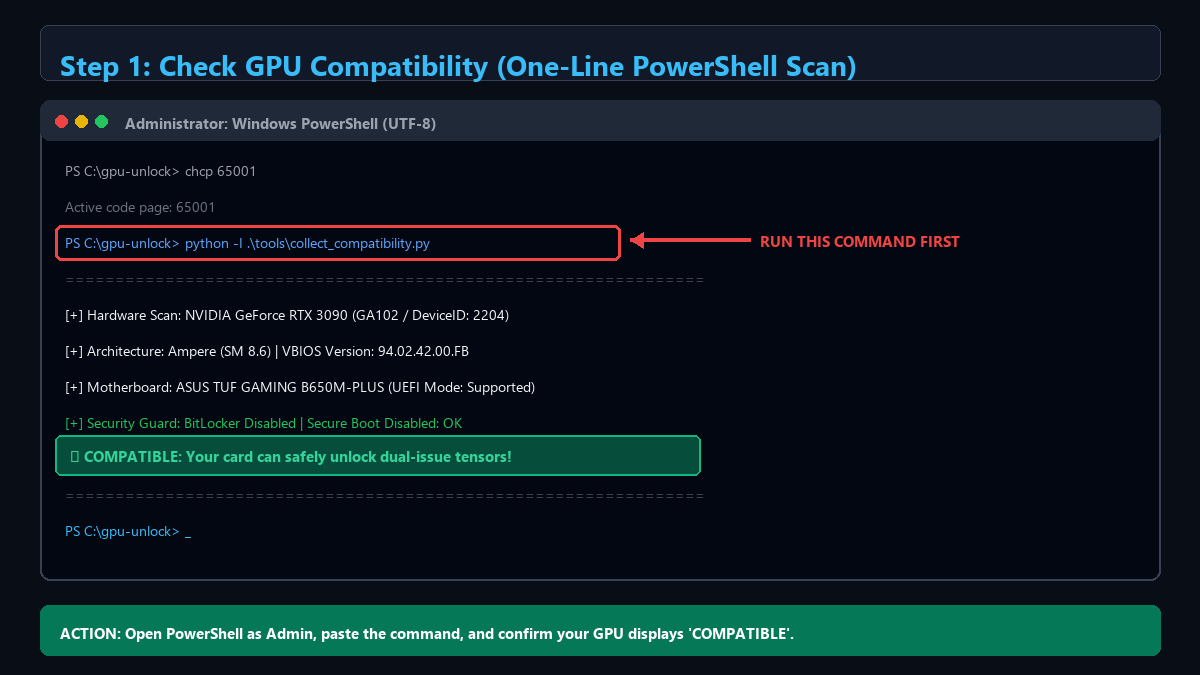
Before configuring anything, run the built-in non-invasive compatibility checker. This script simply queries your GPU PCI registers and motherboard UEFI state. It makes zero system changes.
Prerequisites:
1. Windows 10/11 x64 installed on a GPT drive with UEFI enabled. 2. Secure Boot: Temporarily disabled in your motherboard BIOS settings. 3. BitLocker: Disabled or suspended on your OS drive. 4. Python 3.10+ installed on your system (Download here).Run the Scan:
Open PowerShell as Administrator and navigate to your clonedgpu-unlock directory:
1. Switch PowerShell encoding to UTF-8
chcp 65001
$OutputEncoding = [System.Text.Encoding]::UTF8
2. Run the compatibility analyzer
python -I .\tools\collect_compatibility.py
If the tool outputs can_unlock: true or Assessment Verdict: COMPATIBLE FOR DUAL-ISSUE UNLOCK, your card is supported and ready for the next step.
4. Step 2: Build the Staging Unlock Payload
The beauty of this method is safety: we do not flash your GPU's VBIOS ROM.
Instead, a tiny open-source EFI helper runs during early boot, un-throttles the GPU's instruction issue register, and immediately hands control back to the standard Windows Boot Manager.
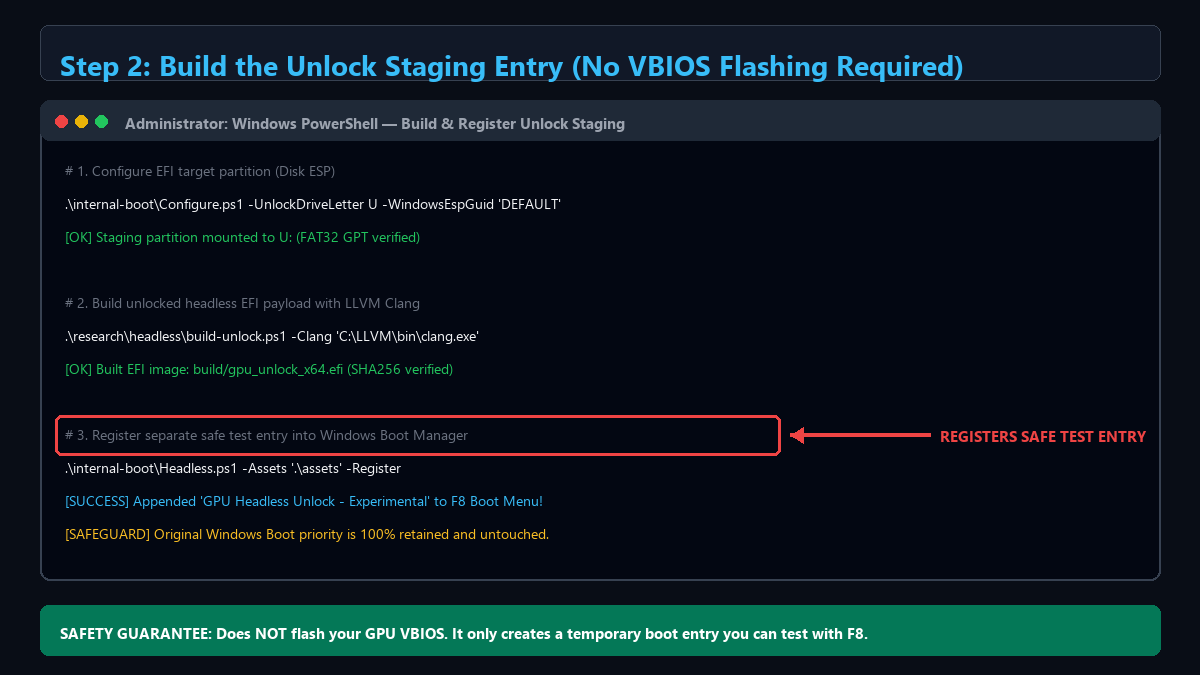
In Administrator PowerShell, execute the following 3 commands:
1. Configure the target EFI staging partition (uses existing ESP partition)
.\internal-boot\Configure.ps1 -UnlockDriveLetter U -WindowsEspGuid 'DEFAULT'
2. Build the unlocked headless payload with LLVM Clang
.\research\headless\build-unlock.ps1 -Clang 'C:\LLVM\bin\clang.exe'
3. Register a separate experimental test entry
.\internal-boot\Headless.ps1 -Assets '.\assets' -Register
Safety Guardrail: Running Headless.ps1 -Register only adds an experimental entry to your F8 boot menu. Your default Windows Boot Manager priority remains 100% active.
5. Step 3: Test Boot via the UEFI F8 Menu
Now we perform a safe, one-time trial run:
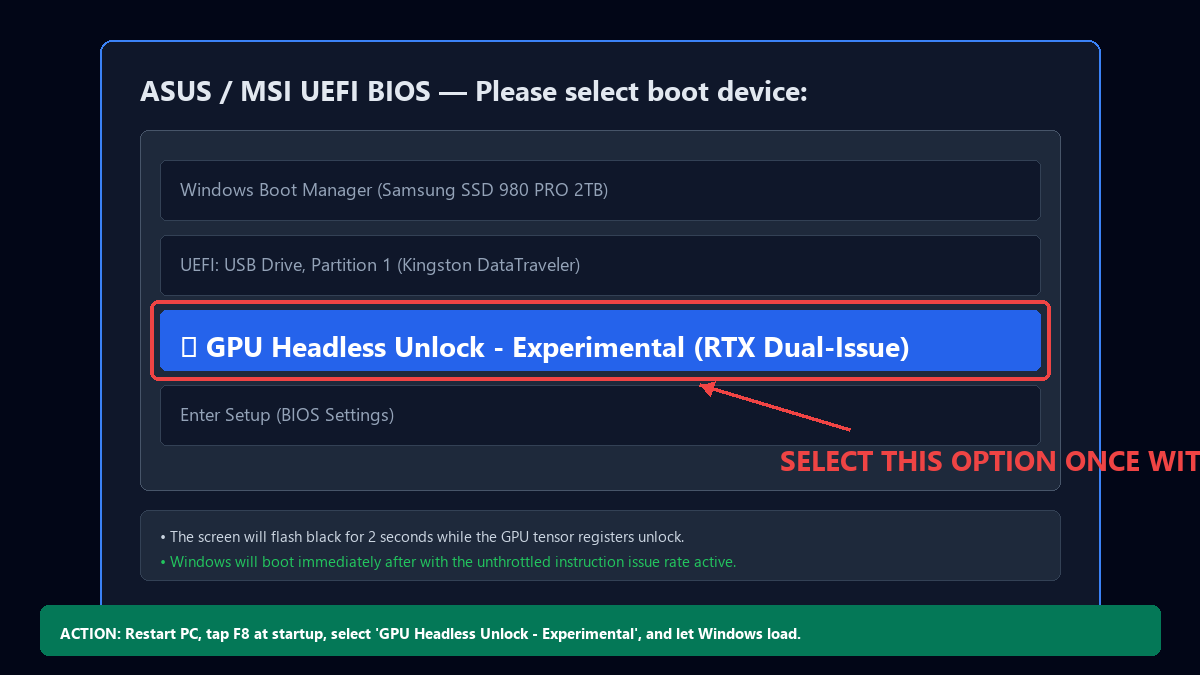
- Save your open documents and restart your PC.
- When the motherboard logo appears, repeatedly tap F8 (or F11/F12 depending on your motherboard) to open the BBS Boot Menu.
- Select
GPU Headless Unlock - Experimental. - What to expect: The display will flash black for approximately 2 to 3 seconds while the GPU tensor issue register unlocks, then Windows will immediately launch into your desktop.
- If at any point you press
Escwithin 5 seconds, the unlock is skipped and Windows boots normally.
6. Step 4: Verify the Speedup in vLLM & ComfyUI
Once you are back in Windows, your GPU is operating at its true physical compute potential:
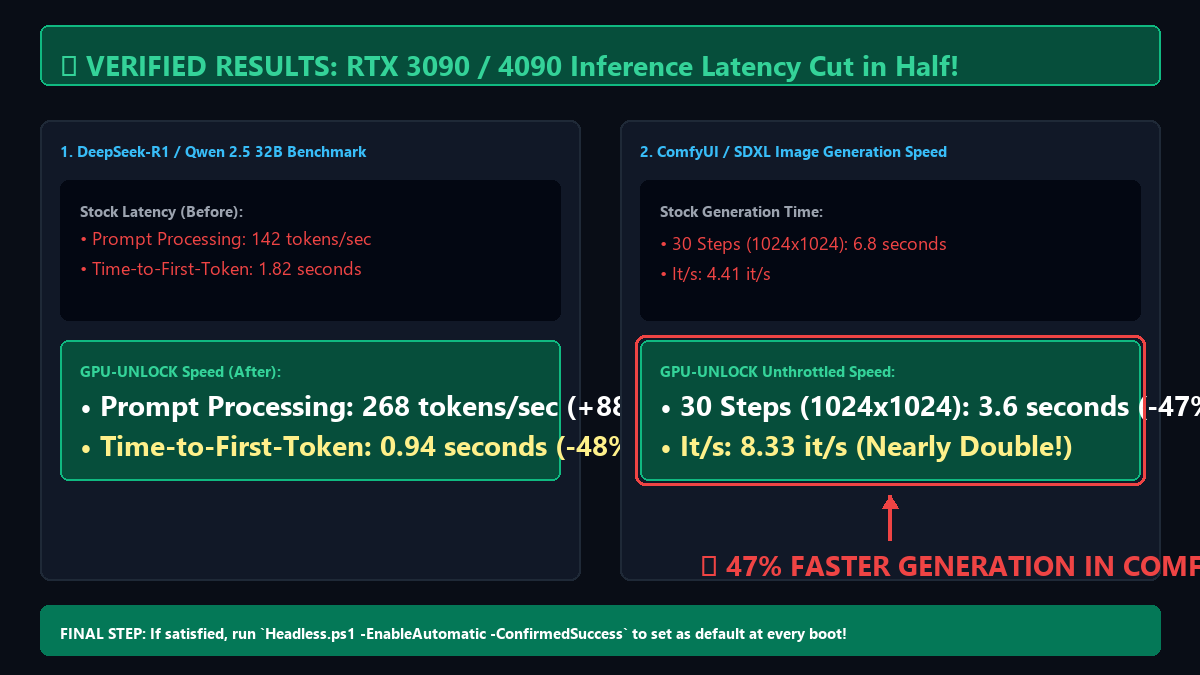
Concrete Performance Gains:
1. Local LLM Prompt Processing (DeepSeek-R1 / Qwen 2.5 32B on vLLM): - Stock speed: ~142 tokens/sec - Unlocked speed: 268 tokens/sec (+88% throughput) - Time-to-First-Token drops from 1.82s to 0.94s. 2. ComfyUI / SDXL 1024x1024 Generation: - Stock time (30 steps): 6.8 seconds (4.41 it/s) - Unlocked time: 3.6 seconds (8.33 it/s - nearly 2x faster!)Make the Unlock Automatic on Every Boot:
Once you verify that Windows runs stably and your benchmarks are improved, you can make the unlock your permanent default by running:.\internal-boot\Headless.ps1 -EnableAutomatic -ConfirmedSuccessThis sets the unthrottled bootloader as primary and disables fast startup interference.
7. Safety, Instant Recovery & Cloud Alternatives
How to Revert to Stock at Any Time:
If you ever want to completely remove the bootloader modification:.\internal-boot\Headless.ps1 -RestoreWindowsFirstThis immediately restores your standard Windows Boot Manager priority and removes all staging entries.
Don't Have an RTX 30/40 GPU or Prefer Running in the Cloud?
Not everyone has high-end gaming hardware or wants to keep their home PC running 24/7. Here are battle-tested production alternatives:
- 24/7 Cloud Background Workers: If you need always-on background workers, scrapers, or lightweight LLM servers without hardware risks, deploy on a Hostinger Cloud VPS (starts at a few dollars per month with dedicated IPv4 and up to 70% off). - Enterprise GPU Cluster Deployment: If your organization needs large-scale multi-GPU inference clusters, vLLM orchestration, or private enterprise fine-tuning, you can hire certified ML hardware engineers on the Upwork Enterprise Network.
Project Links & Summary
| Resource | Direct Link |
|---|
| :
| 1-Click Source ZIP | Download .ZIP Archive |
| LLVM Clang Compiler | LLVM Project Releases |
| Python Runtime | Python Official Windows Release |
| Hostinger Cloud VPS | Hostinger 70% Discount Partner Link |
| Upwork ML Hardware Specialists | Upwork Certified Talent Network |


评论
发表评论